Thinking of a career as a voice-over artist? Maybe you have already started doing some voice work, and you want to enhance your skills? If so, one of the most valuable assets you should work with is your voice. Some of the most magnificent voice-over artists like Billy West, Seth MacFarlane, Tara Strong, Hank Azaria, and Don LaFontaine have shown how one can use their voice to carve a niche in the voice-over industry. So, what is the proper microphone placement range?
Well, it all starts with proper voice exercises and, more importantly, good microphone use. Many great voices will get lost in shoddy technical work, mostly related to microphone use. If you want to excel as a voice artist, you have to learn how to use the microphone properly.
This guide highlights factors that can affect the quality of your voice recording from the proximity effect, finding the right microphone distance from the mouth to the types of microphones, among others.
If you prefer to watch a video instead, click here:
This post has been updated in October 2021.
Why Microphone Placement Matters For Voice Over Artists
While your producer and sound engineers are in charge of the voice recording, you’ll also have to understand what goes into the process. Experienced voice-over professionals tend to spend less time in the booth because they know how to handle the microphone. You too will find it less frustrating when working in a studio full of experienced technicians.
Despite the advances in recording equipment and technology, the microphone remains one of the essentials in the recording studio. Microphone placement plays a vital role because:
- Half of the overall sound in a recording comes from the source. In this case, they are the voice-over artist, music instruments used, plus other sound effects.
- There’s a lot of sound in the environment (about 20%) that goes into any recording. It mostly comes from the room’s HVAC system and other sources.
- Mic placement affects 20% of the overall sound. The position of the microphone determines the impact of noises from the environment. It also affects the quality of voice from the source that will go into the recording.
- The type of microphone you choose will also have an impact (10%) in the overall sound.
When working with sound engineers in a studio, you’ll notice a lot of focus going into the microphone placement. Slight adjustments can make all the difference. That’s why the tech guys are at hand to guide you.
If you want to excel in voice-over work, you have to start developing proper microphone placement early enough. It is a lifelong skill that you will vary depending on the type of microphone, the environment, and your voice.
Is there a Magical Microphone Distance from the Mouth?
Anyone who has used a microphone always wonders if there’s any magical microphone distance from the mouth. If such a range existed, it would make things much easier for voice recordings.
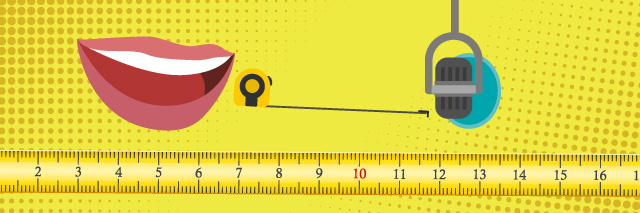
The ideal distance should be such that the microphone only picks up the sound of your voice while avoiding the other sounds of the room.

The appropriate length for the most common microphone (a large-diaphragm condenser) is 6-12 inches away from your mouth.
Finding That Perfect Microphone Distance from the Mouth
While 6-12 inches is the most common distance used for microphone placement, other factors are also in action. Finding the perfect range to place your microphone from your mouth is an activity a voice artist does at every recording.
You might be using different microphones in different studios, and for each situation, the microphone distance from your mouth might vary. To help adapt quickly and find the best microphone placement, below are some crucial factors to consider:
1. Proximity Effect
The proximity effect refers to an increase in low frequency or bass response as one moves more closer to the microphone. Despite it being a significant issue for bidirectional mics, it is a minor factor for cardioid mics and omnidirectional mics.
If you are recording a demo or auditioning for a voice-over gig, you should be aware of the proximity effect: it can ruin an otherwise impeccable recording. However, you should not move very far away from the microphone; this will give your voice project an airy feeling by taking away the bass.
To get the best mic distance, do a few test runs and have in mind the kind of sound you wish for your recording. For instance, if you want a more massive sound, you can move closer to the microphone for that bass.
2. Find the ‘Sweet Spot’ for your Microphone
If you listen to more experienced voice-over artists, you’ll notice a smooth edge in their recordings. It happens even with their first takes at the studio booth. One reason for this is the fact that these professionals know how to find the mic’s sweet spot without difficulty. The sweet spot is the mic position in relation to the sound source where the source sounds best.
If you can find that sweet spot easily, you’ll always enjoy your recordings. This mic placement depends on both your voice and the acoustic environment. By finding that sweet spot, you’ll get better results for any record. You have to test different positions to find the perfect one that yields the best acoustic results.
With time, you’ll find that spot on the microphone where your voice is at its absolute best. Moreover, it will become instinctual with more tests and recordings. Becoming acquainted with the equipment will make it easier to eliminate background noises from your voice project. It will result in a shining voice throughout the final product.
Different microphones have unique characteristics, and you should relax and play around with your voice until you find that position on the mic where it sounds the best.
Furthermore, the polar pattern of your microphone can also help you find the sweet spot faster. Take a look:
- Cardioid-type microphones: use a plug on one ear while cupping the other. Listen carefully with the open ear and try to find the sweet spot. Once you find it, set up the mic such that the capsule points perpendicular to your palm toward your mouth.
- Stereo microphones: Use your hands to cup both ears and move around to find the sweet spot.
- Omnidirectional microphones: With one ear plugged, listen carefully with the open one while also moving around. Once you find the sweet spot, point the omni-mic there with the capsule taking the position where your open ear was.
3. Different Mics And The Distance From The Mouth
During your voice-over work, you’ll have to use different microphones. It is important to remember that finding the right microphone distance from the mouth is a repetitive process. You have to remember the proximity effect and also discover the sweet spot every time you are in the studio.
Different microphones have varying recommended lengths from the mouth. Take a look:
i. Cardioid Mics
Your distance from this type of microphone profoundly affects the quality of your sound in the final recording. The minimum distance you can have for these mics is 4 inches, which gives a warm and intimate sound. If you leave 12 inches between the mic and your mouth, you will get an airy and open recording. Six inches provides the best results for these Cardioid microphones.
ii. Figure 8 Mics
This mic picks sounds from both sides. It is ideal for recording a singing instrumentalist/guitarist, two voices at the same time, and for stereo recordings. The mic tends only to pick the sounds you want.
iii. Dynamic Mics
This is a microphone you use up and close. The lowered end design will counteract the proximity effect. With a dynamic condenser, you can get as close as you wish and record your voice over demo or any other work.
iv. Omnidirectional Microphones
Unlike Cardioid microphones, the proximity effect doesn’t affect omnidirectional mics profoundly. You can get close and cozy with your mic without affecting the recording. You can also get whispery vocals from a distance of 1 inch without damaging your voice project. They work best for recording orchestras, acoustic guitars, or background vocals.
While at it, you should also query a microphone’s address type and polar pattern. Every receiver has a direction from which it is most sensitive. Understanding this will help with proper mic placement.
There are two categories of mic address categories:
- Top address: More sensitive to the direction in which they point. The response line points out of the top.
- Side address: Ribbons and large-diaphragm condensers microphones fall in this category. These are sensitive to sounds from the sides rather than where they’re are pointing.
4. Effects of Voice Plosives
Some sounds will come from your mouth in a burst of wind. These plosives form when forming some consonant sounds. They can affect the recording depending on how far the microphone is from the mouth.
One way of reducing the impact of plosives in your recording is by moving the mic further away. This helps dissolve the plosive energy in the air before they hit the microphone. You can also tilt the pic at an angle such that the plosive sound doesn’t hit the mic diaphragm directly.
5. Use a Pop Filter
When recording at the studio, your sound engineer will most likely recommend the use of a pop filter. This tool helps to overcome the variance in the distance that occurs when you record.
A pop filter tends to come between your mouth and the microphone. Its objective is to aid in keeping a reasonable microphone distance from the mouth at all times.
Other Microphone Use Tips For Voice Overs
To improve your voice over recordings, consider the following microphone placement and use tips:
- Avoid touching the microphone, the stand, or anything else affecting the mic.
- Don’t ‘eat’ the microphone unless when using dynamic mics
- Stay away from the noise around the amplifier and turn off everything else that produces sound
- Don’t cup the microphone when recording
- Avoid moving your head when reading a voice-over script. Instead, roll the eyes only
- Get comfortable with the microphone and relax. Tension can significantly hamper the quality of your recording
Final Thoughts
A great recording is essential for jumpstarting your voice-over career. If you are starting, these microphone placement tips will enhance your voice-over recordings and give you an edge in the job market. Start experimenting with these tips and use them to practice.
Always take time to prepare before any recording to find the sweet spot and the ideal microphone distance from the mouth.
And always remember that, when you’ve gained some experience, we’re always accepting new talents at Bunny Studio!