Collaboration brings out the best-desired results in any project. It leverages a team’s unique perspective, innovates new ideas, improves work, and creates a new avenue of trust and communication between stakeholders. A year ago, Bunny Studio launched a new collaborative tool called Workspaces. If you haven’t jumped on the bandwagon in creating and managing one, here’s a how-to guide to get your team started quickly.
*We update this page quarterly so that it showcases all releases and new features of our Workspaces tool
What is a Bunny Studio Workspace?
Workspace is a complimentary tool designed for Bunny Studio users. It enables teamwork by allowing more than one user to share a centralized dashboard and do the following actions:
- Submit projects
- Make and manage payments
- Receive files
- Track project progress
- Approve or request revisions

How can Workspaces improve your efficiency?
Unlike other marketplace platforms that charge an extra enterprise premium for access to a similar tool, we made Workspaces available at no cost to all users. All because we understand how greasing in-house and external collaborations can make your operations easier. In addition, we release new features and improvements every quarter based on our users’ feedback, so keep an eye out for those in our quarterly Q Review announcements. Here’s how Workspaces can help you unblock bottlenecks in your workflow below.
The Workspace collaboration
Workspaces provide flexibility and optimize workflows by breaking the rigid chain of command. With a standard Bunny Studio account, all of the above actions are managed by one user, who is usually a project leader or part of higher management. While this chain of command is great for controlling expenses and project outcomes, it has also been a weak link for many larger organizations with single or multi-departmental workflows.
Why it speeds up your production
Our Workspaces provide teams with more autonomy by reducing dependencies that might cause delays due to solo bandwidths. With Workspaces, team collaborators down the chain of command can easily monitor projects and take on simple tasks that require a few days if managed by one dependency. Owning multiple Workspaces also makes inter-silo workflows easier, especially when certain projects are shared with other department teams or external clients. Projects can be moved to the relevant Workspace anytime so your team can access its progress.

Understanding permission rights
We designed Workspaces so that you can fully control how you manage collaborations. Before setting up one, here’s the rundown on what each role can do:
Owners
Owners are responsible and accountable for payments and workspace management. There can only be one owner per Workspace, but owners can own more than one Workspace. The owner seat is usually taken by the master account user or project manager. On top of all the standard capabilities of a personal workspace dashboard, owners can:
- Add and remove collaborators anytime
- Create multiple Workspaces with different collaborators
- Manage account permissions
- Manage financial transactions
- Add and manage multiple credit cards within the same account
- Filter projects by date, ID, and transactions
Collaborators
Collaborators are invited by the owner of a workspace to join. They can do the following tasks within the Workspace, depending on the permission rights granted to them by the owner:
- Create, approve, and reject projects
- Request revisions
- View all collaborators in the same Workspace
- Make payments via a shared payment method
- Join more than one Workspace

How do I get started?
Step 1: Creating a new Workspace
You create Workspace in just a few steps from your dashboard. Here’s how to do so:
- Login to your account.
- Click on your profile name.
- Choose “Switch” under workspaces.
- Click on “Create a Workspace.”
- Read accent the terms and conditions.
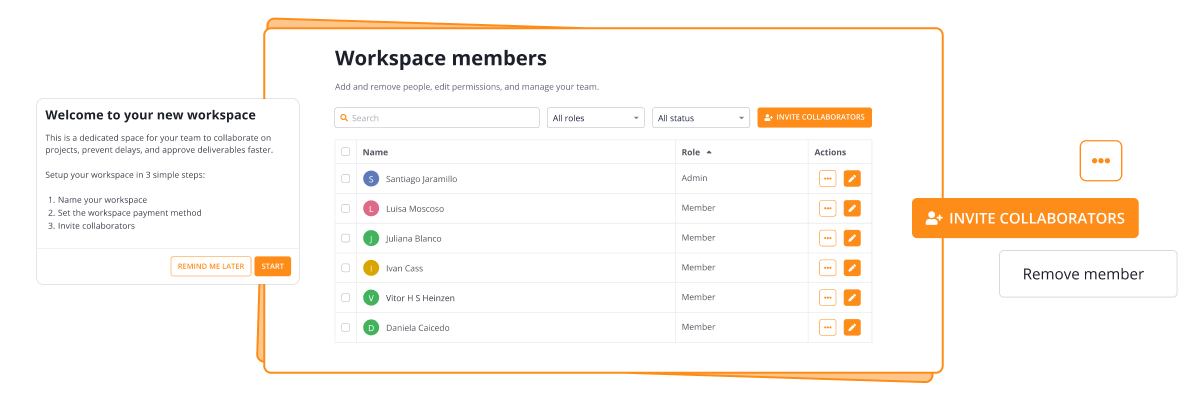
Step 2: Setting up your Workspace
Now you can start inviting collaborators and manage your Workspace. Remember that you can own more than one Workspace, so if you create more than one, name them differently and ensure you are on the correct Workspace when managing your projects and collaborators.
Here’s how to start organizing your Workspace:
- Name your Workspace -include a description of what projects are managed here.
- Set up a payment method -pay with personal payment methods that are already set up, or add a shared payment method for your team.
- Invite collaborators – share an invitation link, or send an invitation email to them.
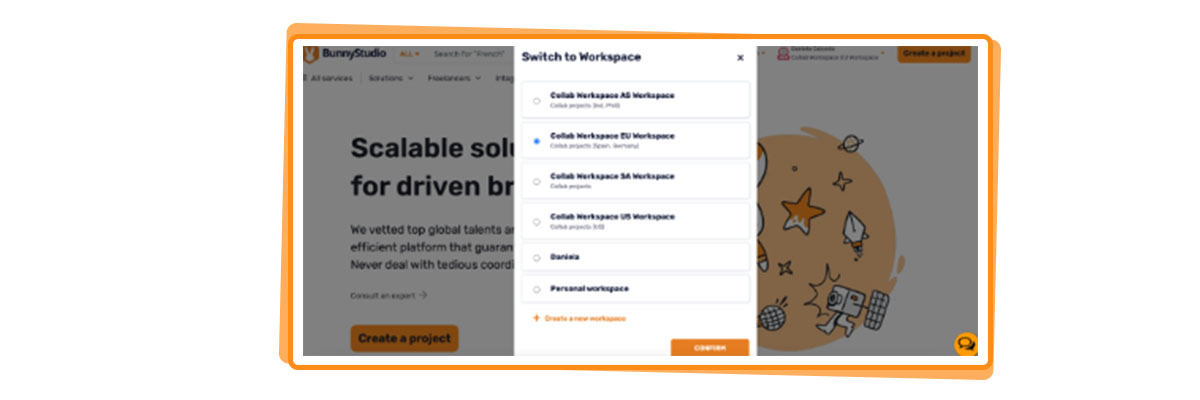
Step 3: Navigating your Workspaces
As an owner
Now that you’re all set up, learn how to get the most out of your workspace. Here are some tips:
- Switch between Workspaces – A welcome message greets you every time you login, and you will be able to see the name of the Workspace you are in. To change Workspaces, click on your account name in the top right corner of the platform and choose “Switch” from the dropdown list.
- Filter projects – Easily search for a project in your workspace by date, ID, and transactions. You can also now filter projects by Workspaces.
- Create a project – Within your Workspace, click “Start a project” to create new projects. You can also move projects from your personal Workspace to a shared one.
- Manage payments – As an owner, you can access the “Payments and Balance” option and take actions such as adding funds, requesting refunds, changing currency, viewing transactions, making payments, adding and editing payment methods, and downloading payment reports. By storing payment information or adding funds on the platform, the Owner authorizes their collaborators to use them as their primary payment method.
- Manage projects – Owners can post projects, request changes, approve deliverables, and cancel projects by default. If the owner deletes a user, their projects will be given to the Owner. They can then reassign them as necessary. You can also view a history of projects in which Workspace collaborators have worked.
- Deleting a Workspace – To delete a Workspace requires moving all existing projects. If you need to delete a Workspace, contact us via live chat or email support@bunnystudio.com.
As a collaborator
You can only be a collaborator if you have been invited by a Workspace owner. Here are some tips to navigate your Workspace as a collaborator:
- Joining a new Workspace – To join, open the email or shared link, click on the “Get started” button on your email, and this will take you to the platform where you log in or register for a new account. You will then automatically be a part of that Workspace.
- Posting a project – If you create a project in a Workspace, you become the project owner. There can only be one owner per project.
- Access payments and balance – You will have access to the “Payments and Balance” but cannot add, edit or manage payments related to the collaborative workspace. Money matters are the sole responsibility of the Workspace owner.
Get more with Bunny Studio+ membership
Did you know you can get lower rates and get better support for projects in your Workspace? With Bunny Studio+, you can reduce production downtime with priority customer support and get membership discounts for selected services.

Bunny Studio+ membership perks
The following perks will be applied to all projects within your one selected Workspace, and team members can access all of the below.
Looking for a membership with more support? Consider Bunny Studio+ Growth.
Bunny Studio+ Growth membership perks
Explore our Growth membership benefits below, applied to any one of your selected Workspace.
- All of the above Bunny Studio+ benefits
- Dedicated full-time or part-time project manager
- Onboarding and checkpoints
- Curated samples upon requests
- Automate and adapt our services to your workflow
Start your one-month free trial on us and learn more about Bunny Studio+ here.
You’re all set to go
Have any questions? Contact us anytime via our live chat, or email support@bunnystudio.com. There’s always a non-AI, real human on the other end of your screen, ready to assist you!
Click on the button below to learn more about our workflows, support system, and tailored products, through our onboarding partner guide.